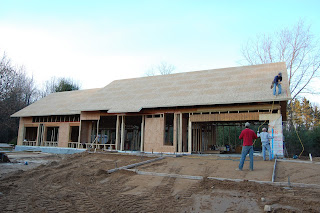
The short week last week was long forgotten as we set the roof trusses on Monday and completed sheathing them today. The roofer will be installing a waterproof membrane over the roof sheathing tomorrow to get us in the dry.

This illustrates a raised heel truss from up in the attic looking down. A typical truss has the rafter which is the top angled piece join the ceiling joist at the top of the wall in a triangle. The depth of insulation at the wall is restricted to the dimension of the two wood members which provides ineffective insulating values near the eaves. To get the insulating value we desire, we designed a space in the truss to accommodate the 30 inch depth of the insulation we plan to install.
 This illustrates the attic truss design. The attic floor allows for 30 inches of insulation, and the attic has a standard 8' headroom. We optimized the pitch of the roof to collect solar radiation on an annual basis at our latitude. This was done partly for aesthetic reasons to avoid having roof racks to support the solar collection devices, but also to reduce the added weight of the roof racks by integrating the solar panels into the design of the roof. This avoids having to reinforce the roof trusses to accommodate additional structural loads.
 The byproduct of this decision is a monstrous attic. We had significantly downsized our living requirements, but we did not want to limit the next owner to a three bedroom home. The attic is designed for expansion. A stairwell can be installed over the basement steps to easily access the attic. Plumbing will be accessible from either of the bathrooms below, and dormer windows can be installed for light and ventilation.
We installed Pex tubing in a chase from the basement to the attic for a future solar hot water system. The hot water heater is designed to accommodate a solar hot water collector. We laid out the locations of all of the mechanical equipment in the basement, and prepared to run the electrical wiring. We want to install the drywall before too much mechanical equipment is installed to make the installation of the drywall easier.
 The excavator brought the grade up so we can pour the last of the concrete. We are required to have a safe means of egress in order to obtain a certificate of occupancy, and installing the permanent walkway is preferable to a temporary walkway. We are fortunate not to have frost in the ground which would have prevented pouring the concrete.
Over the next week we will finish the exterior sheathing, install the plywood “lid”, pour the remaining concrete, install the windows and doors, and come close to completing framing of the interior partitions. The mechanical and electrical rough in will begin in the basement. The excavator will begin the installation of the drain field, septic tanks, and stormwater cistern. Should be a big week.
Here's how to cut your electric bill by 75%:
ReplyDeleteWant to know how to easily produce all of the renewable energy you could ever want right at home?
And you will be able to make your home completely immune from power outages, blackouts, and energy grid outages…
so even if everyone else in your area (or even the whole country) loses power - you won’t.
OUR GUIDE: DIY HOME ENERGY
I learn some new stuff from it too, thanks for sharing your information.
ReplyDeleteRoofer